Integrate Cloudflare Images on your website
Overview
In this tutorial, you will update a website in several iterative steps to leverage the powerful features of Cloudflare Images. Cloudflare Images is a great solution for a website as an easy-to-use image storage, transformation and optimized delivery service.
You will learn:
- How to migrate your website’s images to Cloudflare images.
- How to update your website to serve images from Cloudflare Images, ultimately without changing the existing image URLs.
- How to use variants to resize and transform delivered images.
Other features you will learn about:
- Custom Domain Delivery: How to serve Cloudflare Images from your own domain name.
- Custom IDs: How to store and serve your images under their own, SEO friendly Unicode name and path.
- Flexible Image transformation: How to use transformation parameters in the delivery URL to transform an image on the fly.
- Adaptive Optimized Format Delivery: How Cloudflare Images delivers image formats optimized to every browser, including WebP and AVIF.
Demo website and source code
For illustrative purposes, this tutorial uses the Imagejam demo website build with Cloudflare Pages as a basis for all examples. You can find the source code for this demo website on GitHub.
Learn how to deploy your own Cloudflare Pages website.
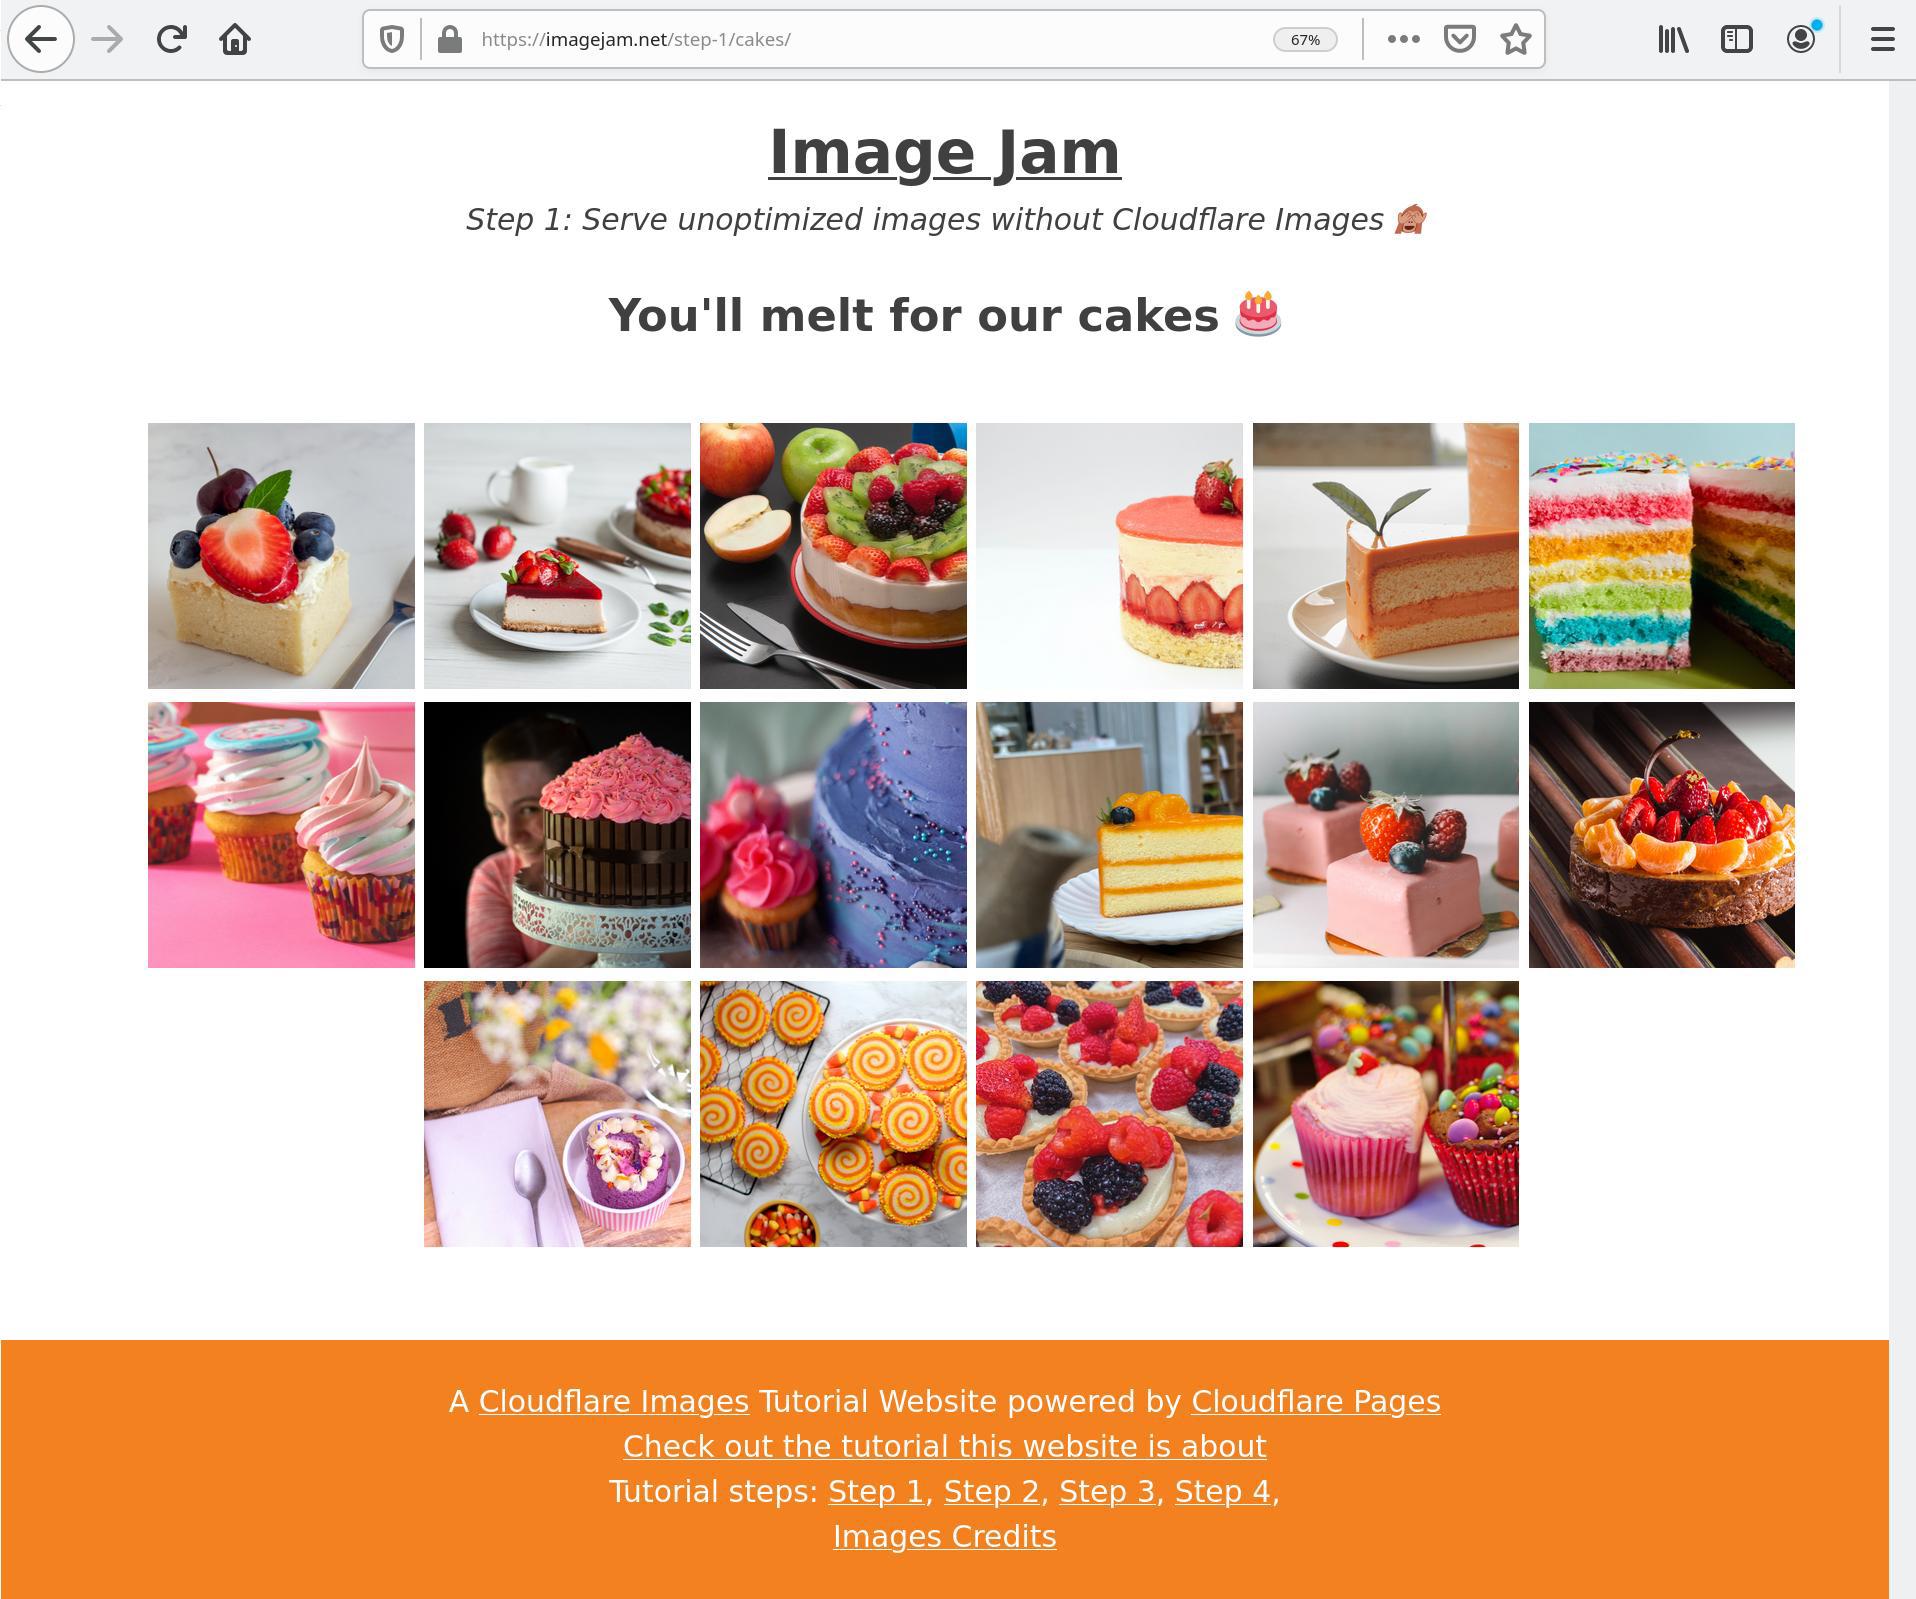
Website not using Cloudflare Images
The demo website we are going to use for this tutorial is not (yet) using Cloudflare Images. If you browse the cake gallery page for Step 1, you can see many image thumbnails.
Selecting an image displays a bigger version of it, as well as its URL, real size and display size.
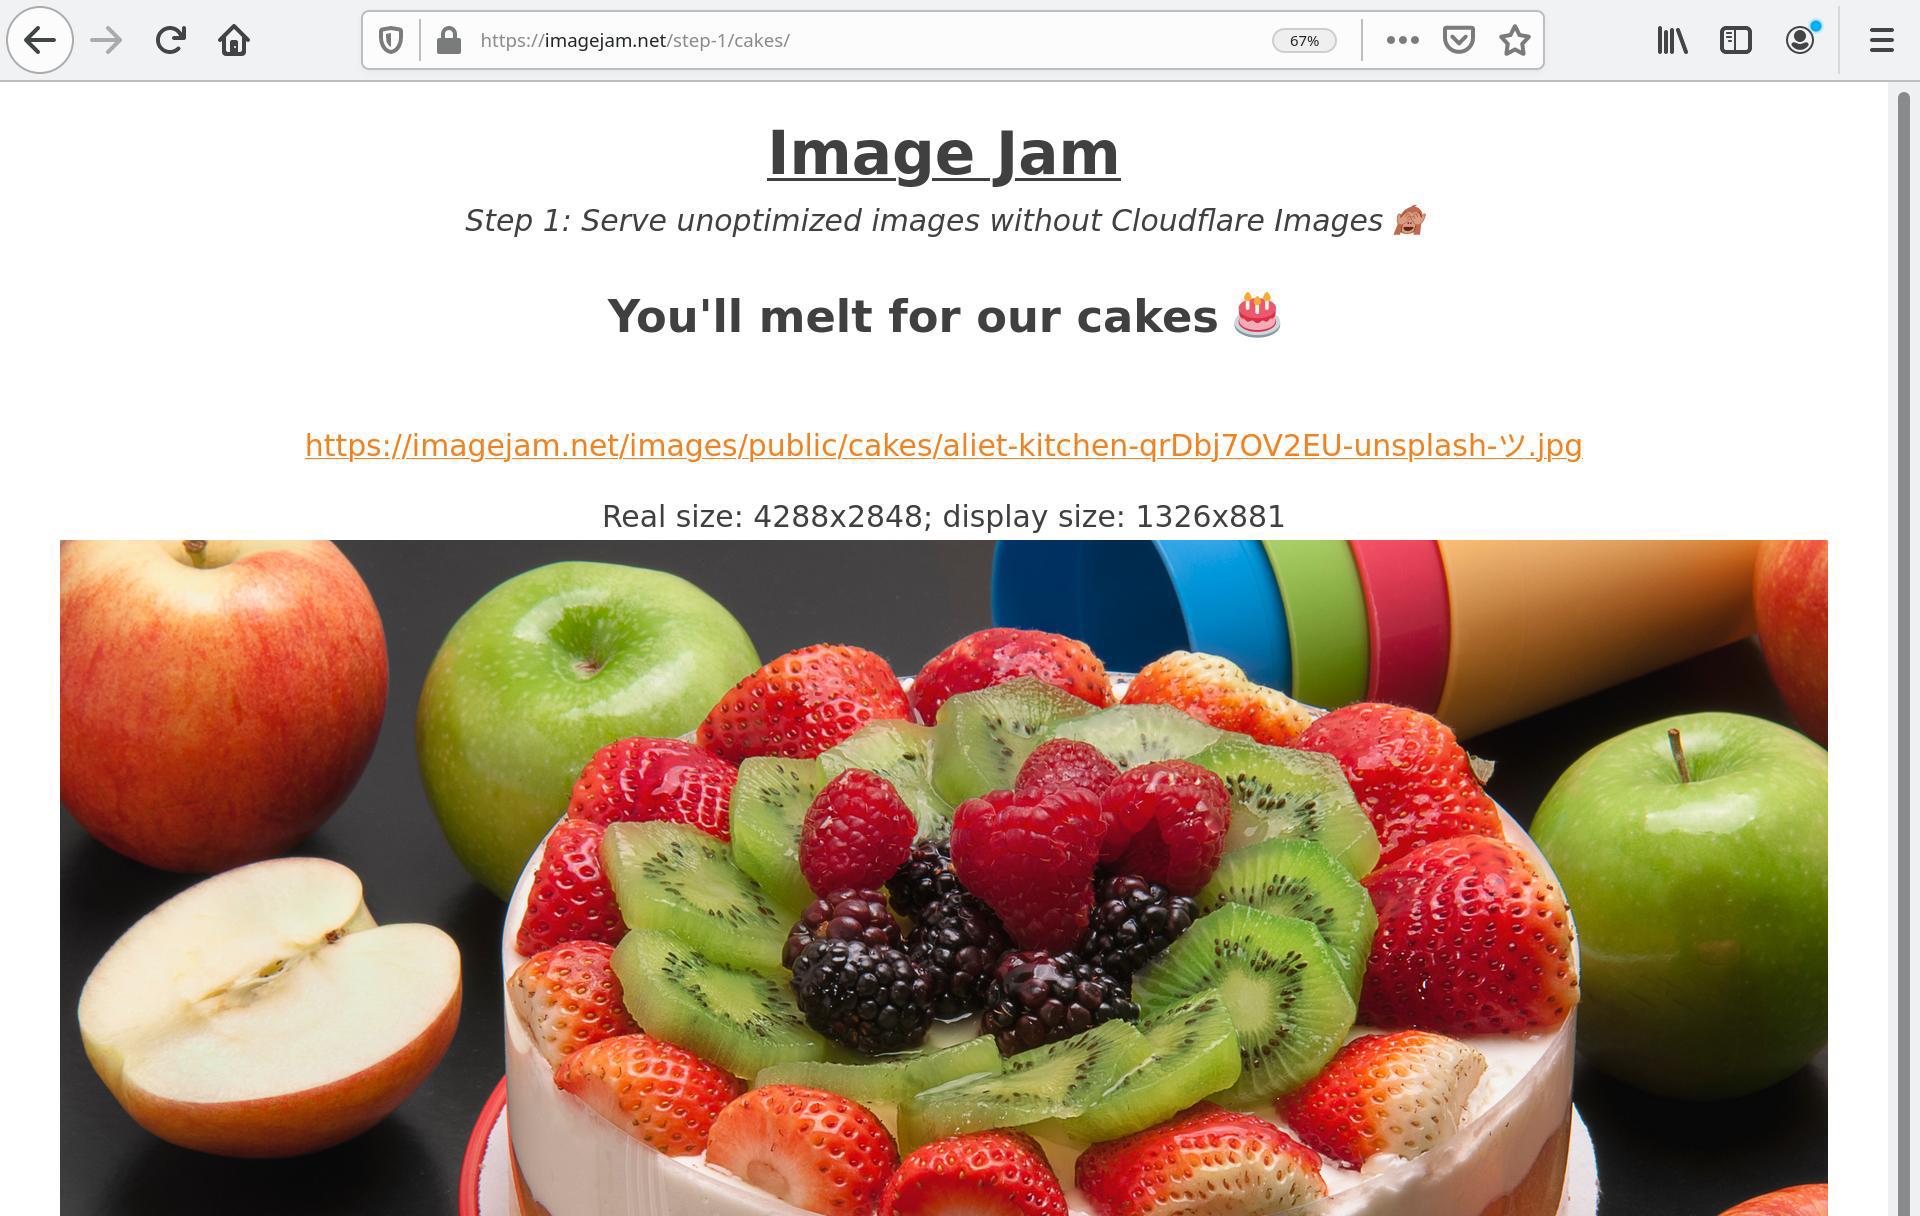
On this example, the image was served with a very high-resolution of 4288x2848 pixels, but is displayed at a much lower resolution. This means most of the pixels we downloaded were wasted upon display.
This happens because, right now, the website is serving the original unoptimized and unresized images, stored in an online file storage (in our case, S3). On the other hand, although it cannot be inferred at a first glance, the image is being served in a fairly heavy JPG format that has not been optimized for the web - and that possibly come directly from a camera.
Right now, images are being served from the website’s domain. For instance, our original image cakes/aditya-joshi--DUN-_bTO2Q-unsplash-ツ.jpg is served from the URL https://imagejam.net/images/public/cakes/aditya-joshi--DUN-_bTO2Q-unsplash-ツ.jpg.
In our Cloudflare Pages website demo, URLs for image delivery are defined in the file
/config.js, in the build step configuration for Step 1.
Here is the relevant extract of this file (edited for brevity):
This configuration provides an image_url function used when building the HTML of the website, that generates the URLs to our website’s images — in this case, served directly by the website and not by Cloudflare Images.
The purpose of this tutorial is to showcase how Cloudflare Images can be integrated on a website to deliver resized and optimized images, adapted to your display and the browser displaying them.
👉 In Step 2 we will integrate Cloudflare Images in our website, but before that we need to upload our images for Cloudflare Images to start serving them.
Step 1 - Migrate images to Cloudflare Images
You need to start by uploading your images to Cloudflare Images. For that, you need a Cloudflare Account with a Cloudflare Images subscription. Head over to the Cloudflare Images sign-up page to sign up.
After signing up, go to the Cloudflare Images dashboard.
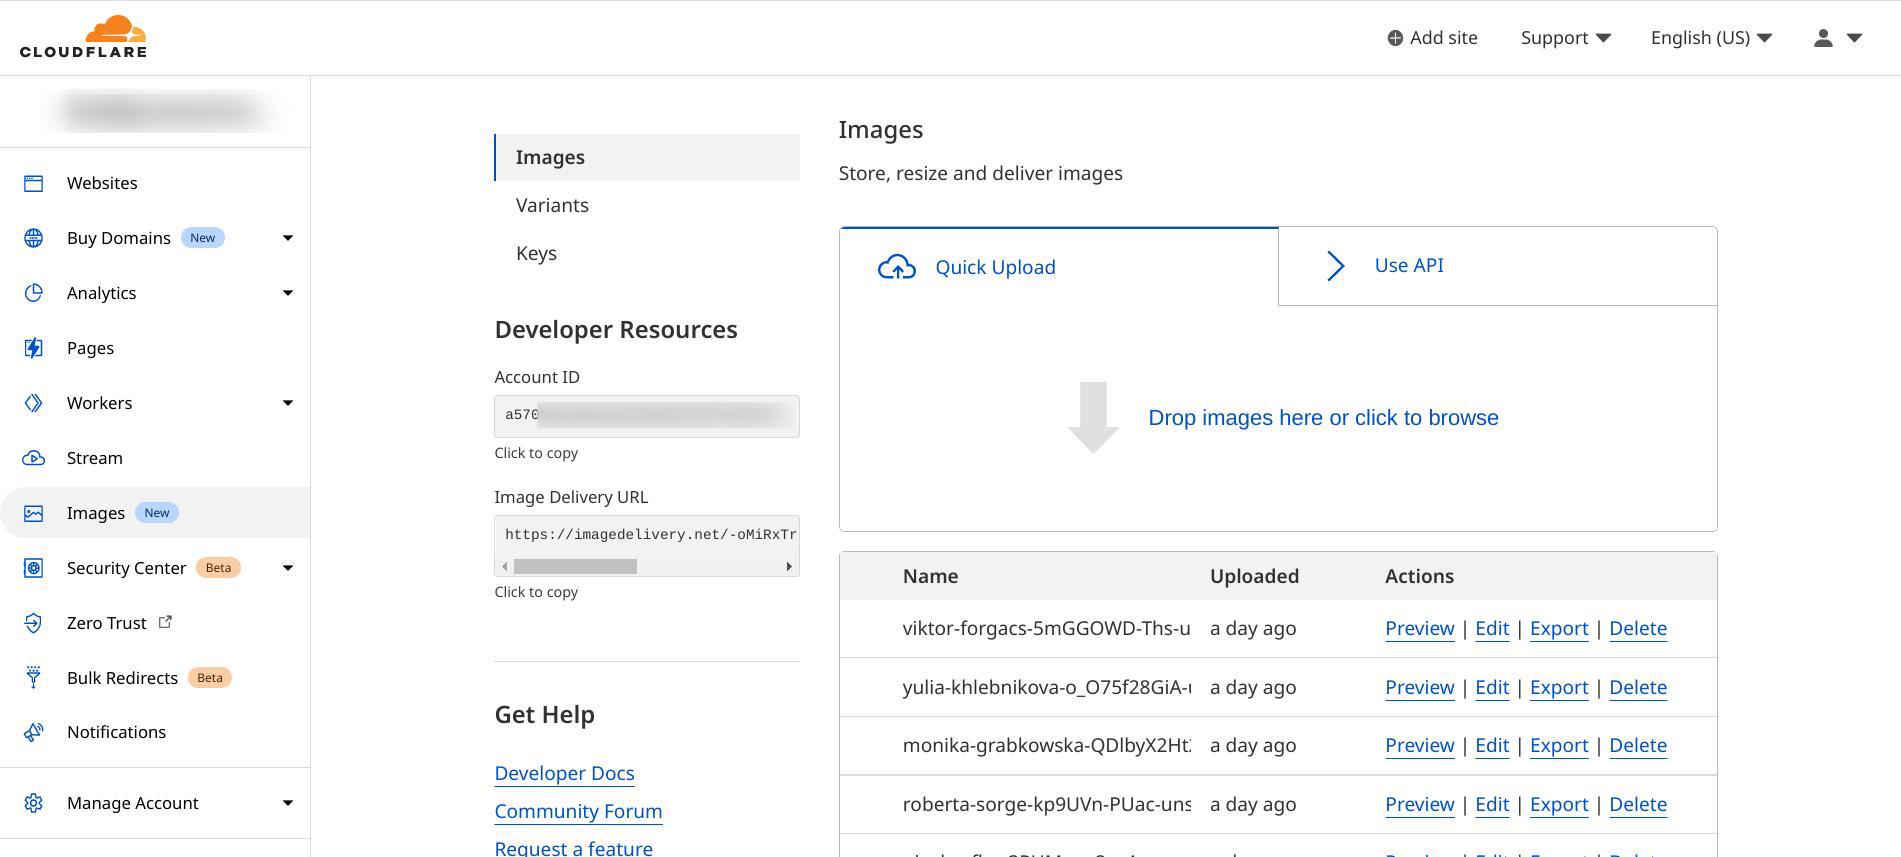
From there, you could upload all your website images manually using the dashboard UI. However, we have a lot of images on our website, so we are going to import them in bulk using the API upload.
The demo website source code contains a NodeJS script with one way to achieve bulk upload to Cloudflare Images. You can find the script in
scripts/migrate/bulkupload.js.
Here is that script, slightly edited for illustrative purposes:
"scripts/migrate/bulkupload.js"// URL where your original images are accessible
const imageOriginURL = "https://imagejam.s3.amazonaws.com/";
const images = [    "cakes/aliet-kitchen-qrDbj7OV2EU-unsplash-ツ.jpg",    "cakes/amirali-mirhashemian-cZFU60dKB6U-unsplash.jpg",    // obtain the list of images to import in any way...
];

bulkUpload();

async function bulkUpload() {    for(image_name in images) {        await upload(image_name, process.env.CF_IMAGES_ACCOUNT_ID, process.env.CF_IMAGES_API_KEY);    }
}

async function upload(imageName, CF_IMAGES_ACCOUNT_ID, CF_IMAGES_API_KEY) {    // Upload image to Cloudflare Images    // CF Images will download the image hosted at the provided URL and store it    // Leverages Upload by URL and Custom ID features of Cloudflare Images    // see https://developers.cloudflare.com/images/cloudflare-images/upload-images/custom-id/
    console.log(`Uploading to Cloudflare Images: ${imageName}`);
    const body = new FormData();    // tell CF Images to fetch this image for us    body.append("url", imageOriginURL + imageName);    // tell CF Images that we want our image to have this ID (ie, its current name)    body.append("id", imageName);
    try {        const res = await fetch(            `https://api.cloudflare.com/client/v4/accounts/${CF_IMAGES_ACCOUNT_ID}/images/v1`,            {                method: "POST",                headers: { "Authorization": `Bearer ${CF_IMAGES_API_KEY}` },                body,            }        );
        if (res.status !== 200 && res.status !== 409) {            throw new Error("HTTP " + res.status + " : " + await res.text());        }
        if (res.status === 409) {            // 409: image already exists, imported by a previous run            console.log("Already exist: " + imageName);        }    } catch (e) {        console.log("ERROR:" + e);    }
}
In a nutshell, this script does two things:
- Obtains the list of images to migrate to Cloudflare Images;
- For every image, ask the Cloudflare Images API to import the image by URL, keeping its current name.
If you need Cloudflare Images API credentials, refer to Obtain Cloudflare Images API credentials below.
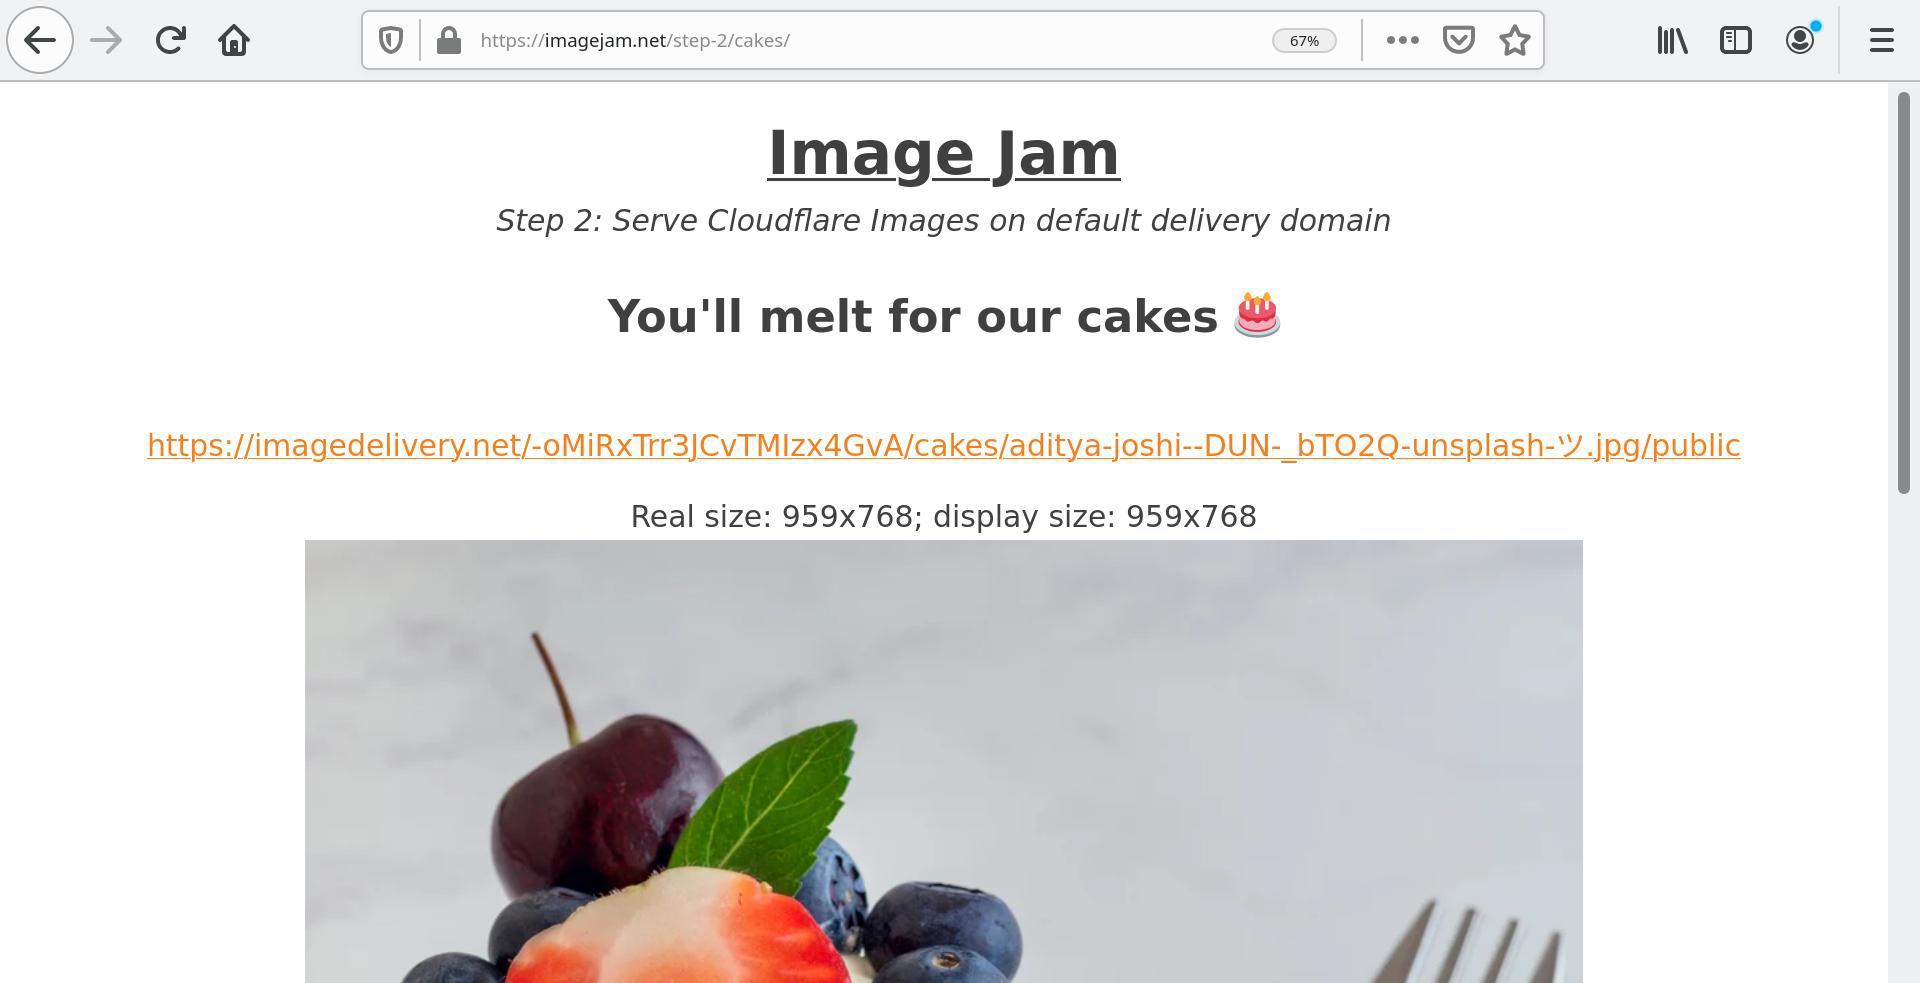
Step 2: Use Cloudflare Images on default delivery domain
Now that your website images have been imported, they are already accessible on Cloudflare Images. Zero setup required!
For instance, our original image cakes/aditya-joshi--DUN-_bTO2Q-unsplash-ツ.jpg is served on the URL https://imagedelivery.net/-oMiRxTrr3JCvTMIzx4GvA/cakes/aditya-joshi--DUN-_bTO2Q-unsplash-ツ.jpg/public.
(Photo by Aditya Joshi - Unsplash)
If we inspect the URL:
https://imagedelivery.netis the default delivery domain for Cloudflare Images.-oMiRxTrr3JCvTMIzx4GvArepresents your Cloudflare Images account ID in an obfuscated way. You can get this value in your Cloudflare Images dashboard.cakes/aditya-joshi--DUN-_bTO2Q-unsplash-ツ.jpgis the original file name. This is the image ID we need to serve it.publicrepresents the variant. This is how Cloudflare Images knows what image size should be served, among many other transformation options.
Cloudflare Images ships by default with a single variant named public, but you can create more variants to fit your needs.
For this tutorial, we created a second variant named thumb with 200x200 pixels, with a cover crop.
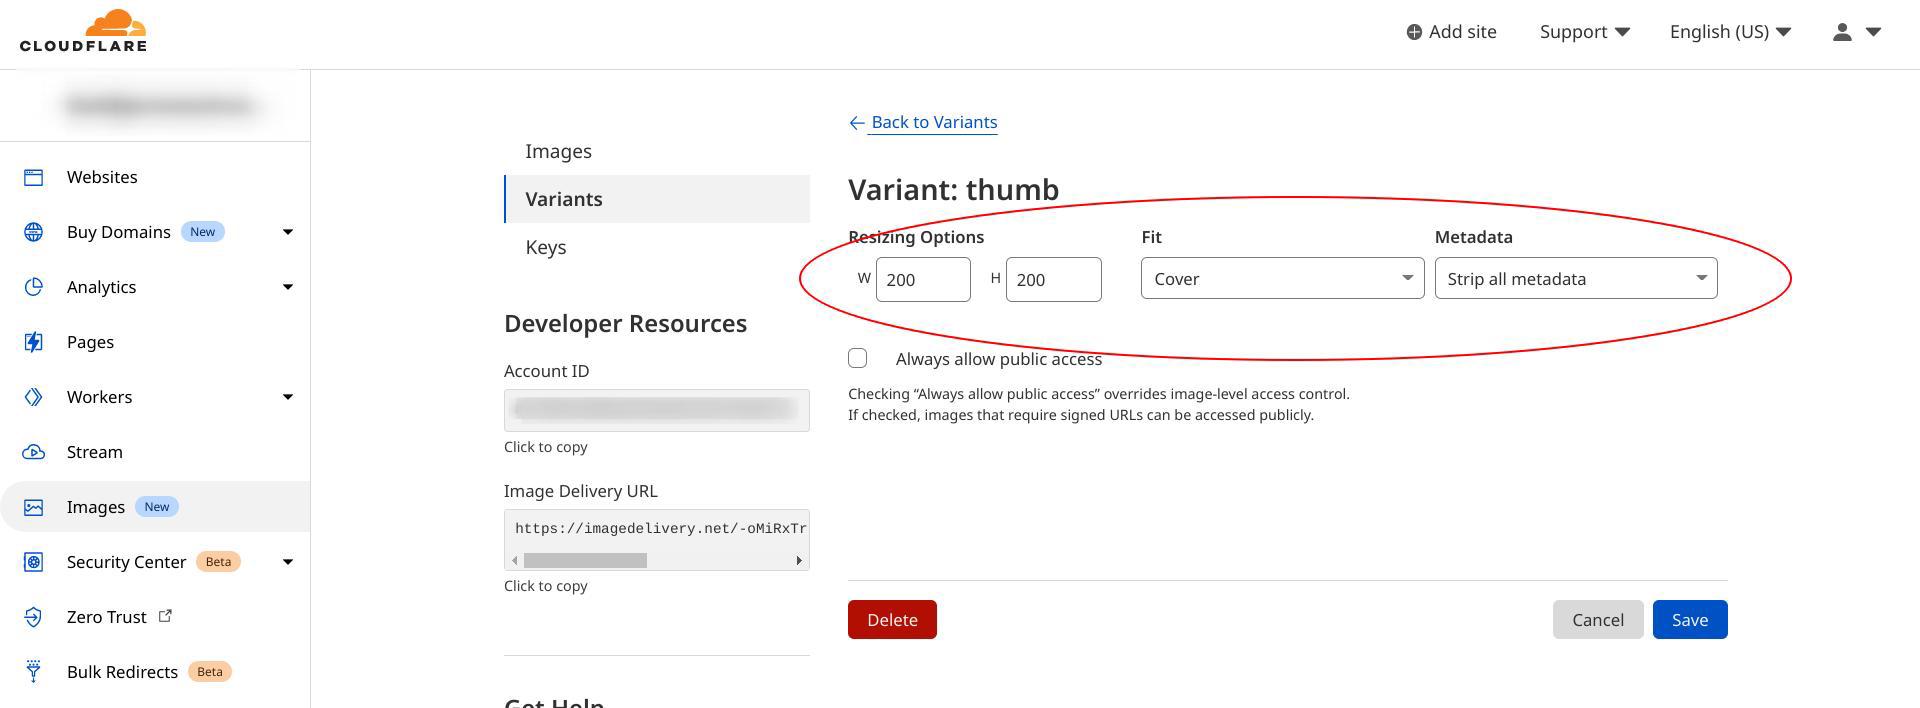
Using the same image as before but with the thumb variant, we get a
much smaller file.

This variant is used in the thumbnails pages of our website gallery.
Update the website to use Cloudflare Images
In the previous section we learned that Cloudflare Images is ready to serve images without any further setup.
Now, let us update our website to serve images using Cloudflare Images. In our demo Cloudflare Pages website, this is done in
/config.js, by adding a build step to the configuration:
Here is the relevant extract of this file (edited for brevity):
This configuration provides an image_url function that is used when building the HTML of the website to generate our image URLs. In this case, the images are also served by Cloudflare Images on the default delivery domain https://imagedelivery.net.
Once deployed, your website will have
much smaller thumbnails, all resized and optimized by Cloudflare Images. Selecting an image, will show that, as expected, they are being served by Cloudflare Images. Their URL will be similar to https://imagedelivery.net/-oMiRxTrr3JCvTMIzx4GvA/cakes/aditya-joshi--DUN-_bTO2Q-unsplash-ツ.jpg/public.
Note as well that the displayed size now matches the real size of the image much more closely, if not perfectly. No more wasted downloaded pixels!
Adaptive Optimized Format Delivery
Adaptive Optimized Format Delivery is a built-in feature of Cloudflare Images. This feature allows Cloudflare Images to automatically serve the best image format to the browser.
Inspecting the details of this image reveals that Cloudflare Images converted it to AVIF, shaving close to 50% in file size in the process, when compared to a JPG of the same resolution. This was made while maintaining the same quality.
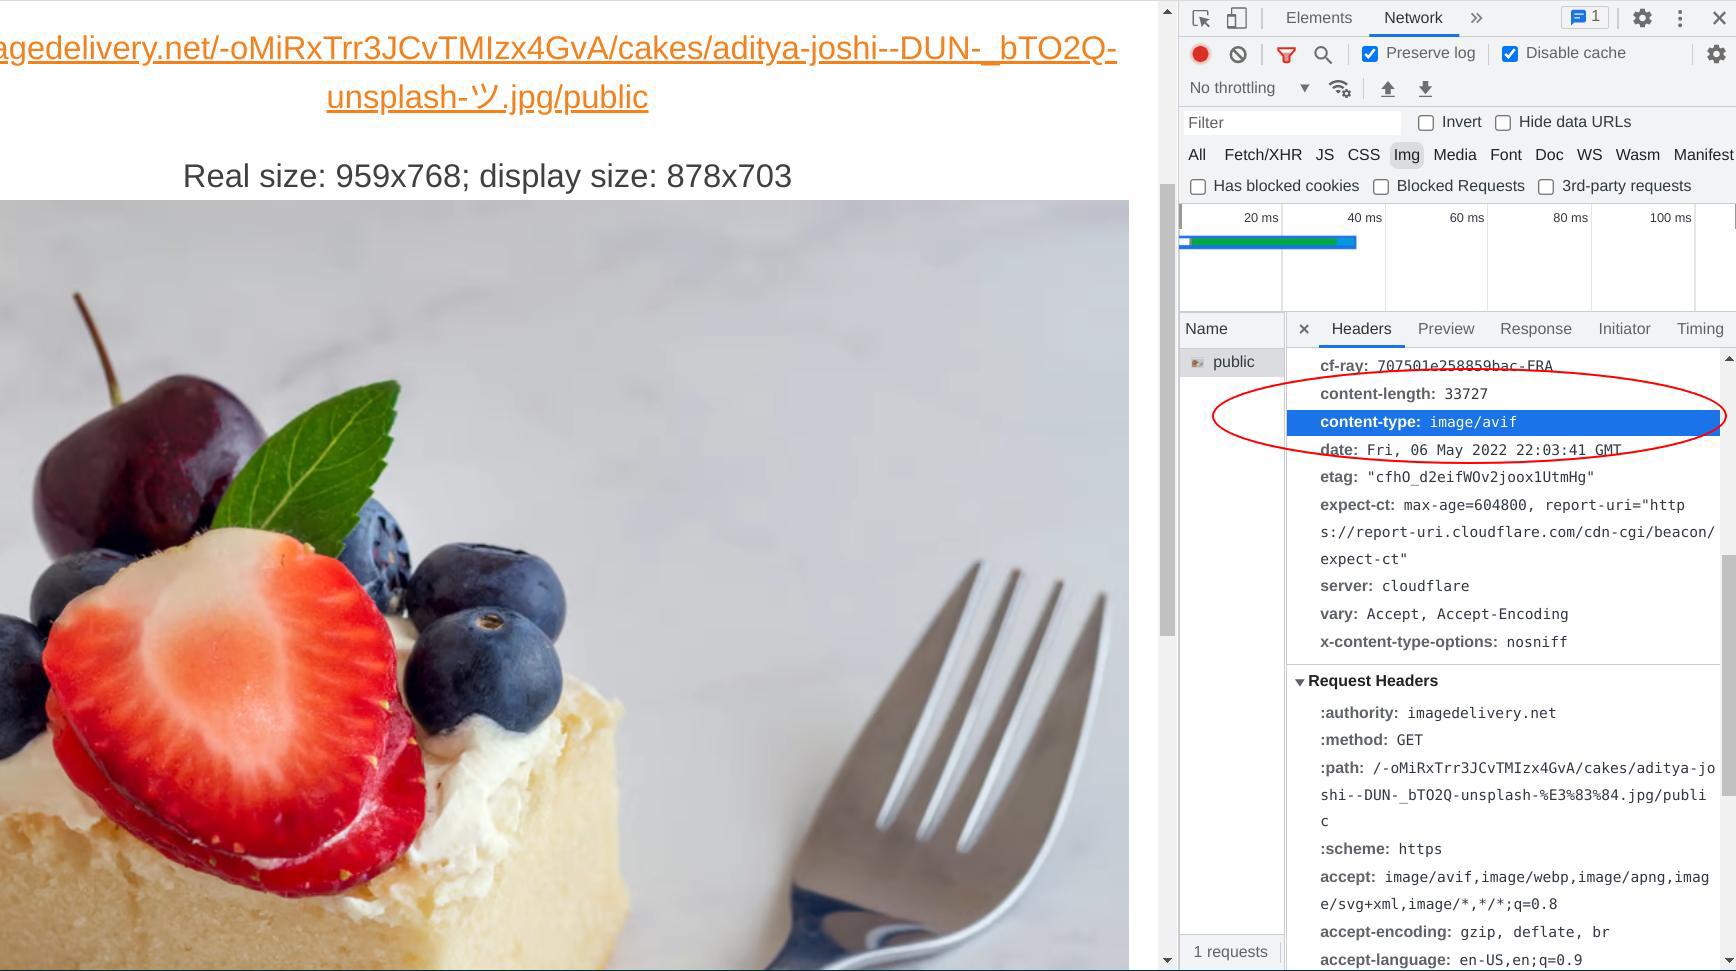
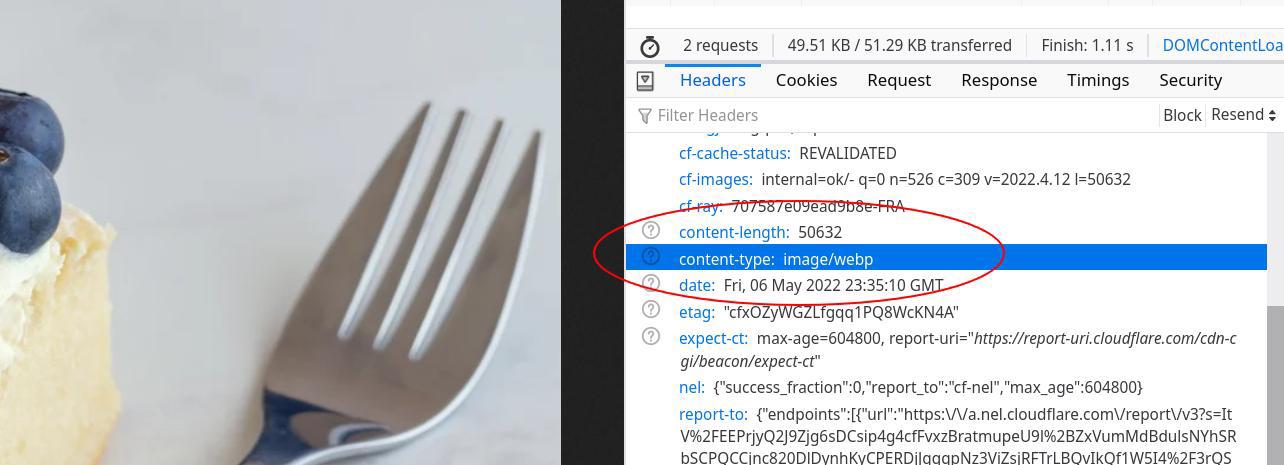
This happens because the browser used (Google Chrome in the screenshot) supports AVIF. Chrome advertises its AVIF support in the Accept: image/avif header it sends to Cloudflare Images while requesting the image. If you use another browser that does not support AVIF (like Firefox), Cloudflare Images will, instead, serve the image in WebP.
Step 3: Use Cloudflare Images on custom delivery domain
In step 2, you learned how Cloudflare Images serves images on its default delivery domain.
However, Cloudflare Images can also serve images from custom domains, no setup required — as long as the domain name is proxied by Cloudflare.
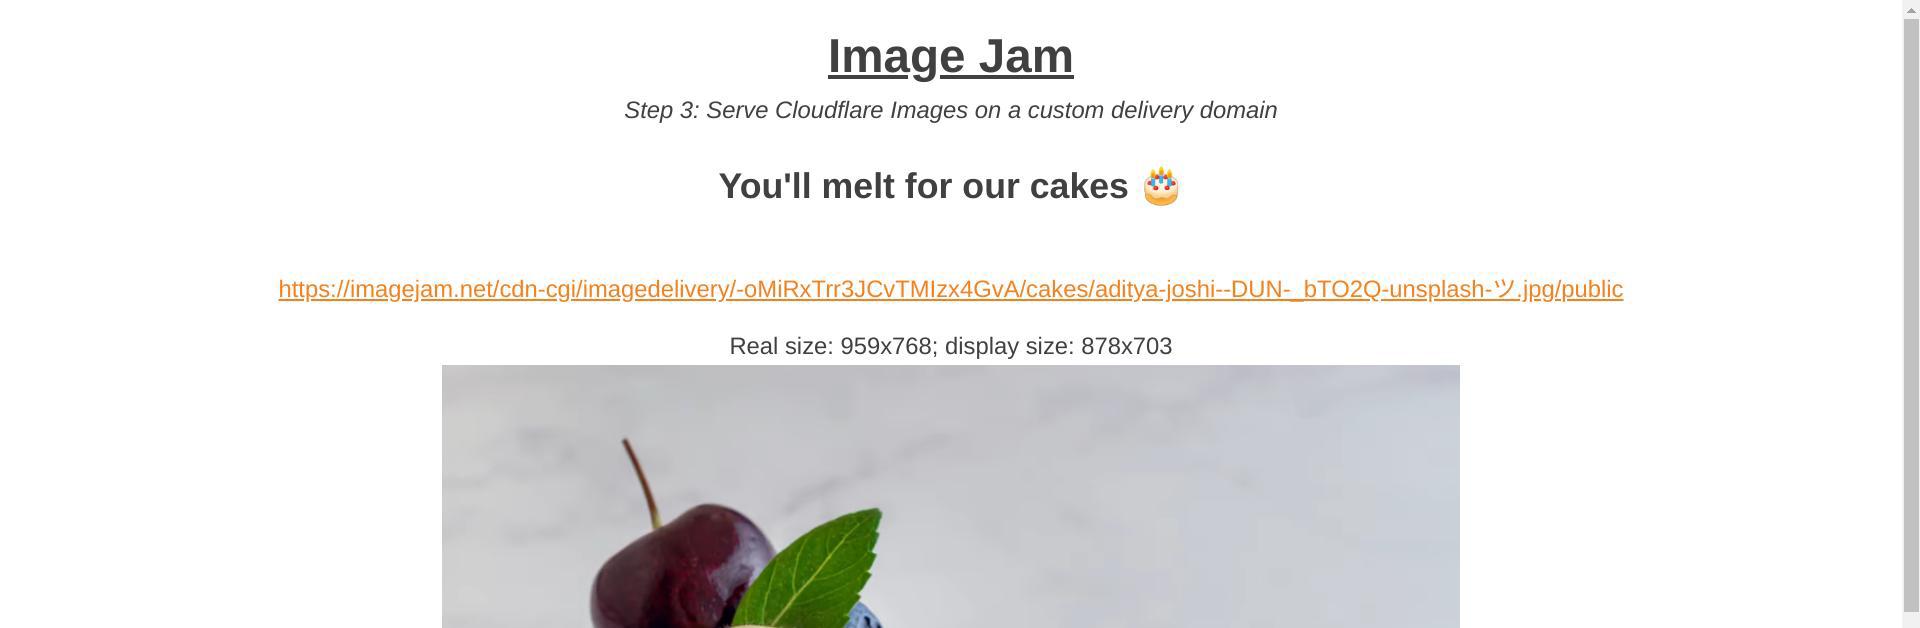
For instance, our original image cakes/aditya-joshi--DUN-_bTO2Q-unsplash-ツ.jpg can be served from the URL https://imagejam.net/cdn-cgi/imagedelivery/-oMiRxTrr3JCvTMIzx4GvA/cakes/aditya-joshi--DUN-_bTO2Q-unsplash-ツ.jpg/public.
This URL is similar to those on Step 2, with these key differences:
- The domain name is our website’s (
https://imagejam.net) instead of the Cloudflare Images default domain (https://imagedelivery.net). - There is an extra
/cdn-cgi/imagedelivery/at the beginning of the path, allowing Cloudflare to automatically identify this URL as a Cloudflare Image, and serve it accordingly.
Update the website to use your custom domain
In our Cloudflare Pages demo website, the custom domain options is done in
/config.js, by adding a third build step configuration:
Here is the relevant extract of this file (edited for brevity):
Once deployed, every image will be served from the custom domain. You can check this by
browsing the cake gallery page for step 3. Selecting any image will show that its URL is as expected https://imagejam.net/cdn-cgi/imagedelivery/-oMiRxTrr3JCvTMIzx4GvA/cakes/aditya-joshi--DUN-_bTO2Q-unsplash-ツ.jpg/public.
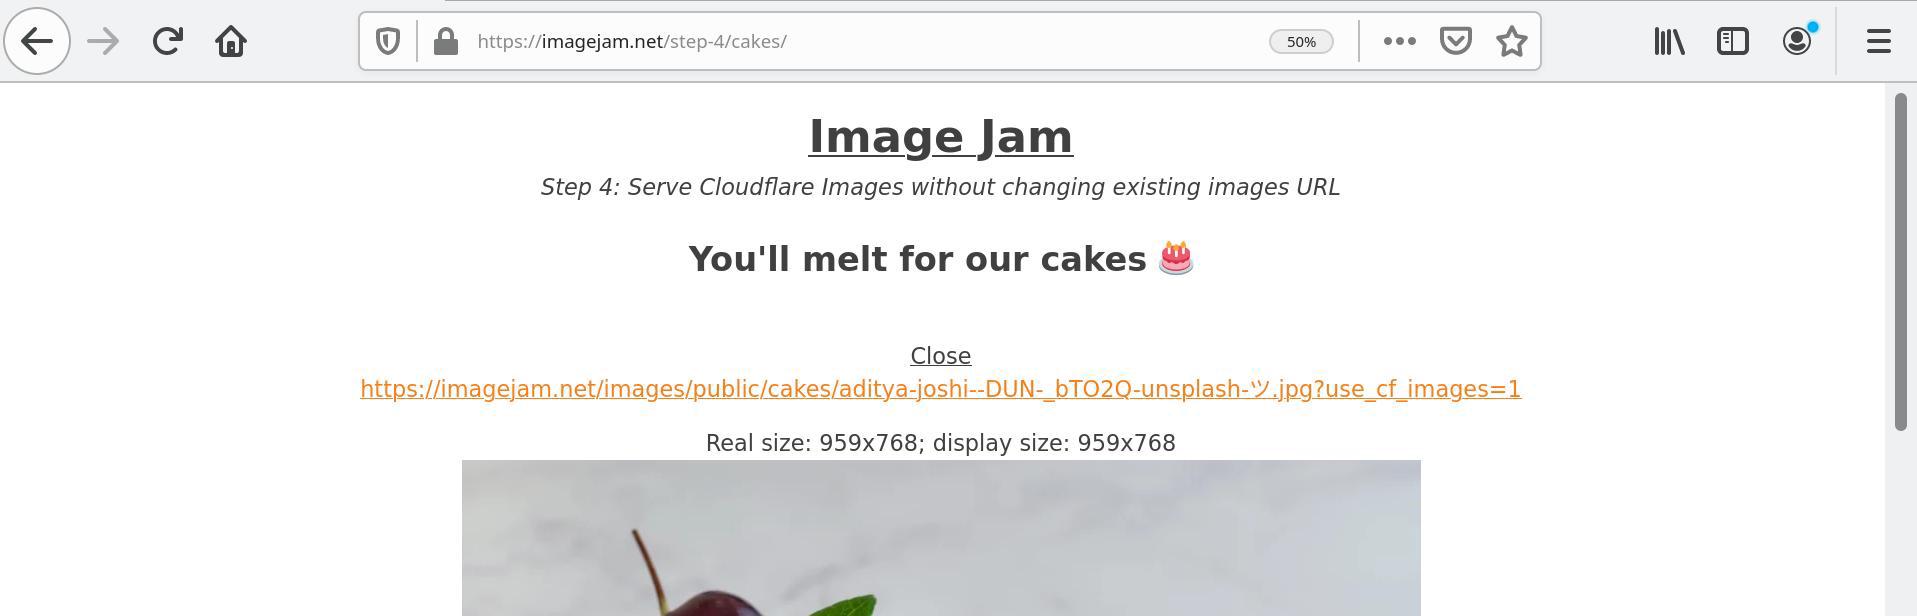
Step 4: Use Cloudflare Images without changing existing images URLs
So far we have shown you how to integrate Cloudflare Images in your website by changing the images’ URLs to target the Cloudflare Images services.
While this is a easy, zero-setup way to optimize your image delivery, you might prefer to have your own URLs and website code unchanged, and still benefit from all the Cloudflare Images features.
This is possible by having a Cloudflare Worker intercepting the traffic of your unchanged image URLs, and transparently relaying it to Cloudflare Images.
The code for our Cloudflare Pages demo website is shipped with such a Worker. You can find it in
/images-worker/index.js.
Here is the relevant extract of this file (edited for brevity):
In a nutshell, this code receives HTTP requests for images on their original URLs, and relays them transparently to Cloudflare Images before responding to the HTTP client, effectively proxying traffic between your website and Cloudflare Images.
Once the worker is deployed, your website will use Cloudflare Images with the original, unchanged URLs. Refer to Step 4 in the demo website the check the result.
For more information about how to publish a Worker on your Cloudflare account, refer to Cloudflare’s Workers documentation.
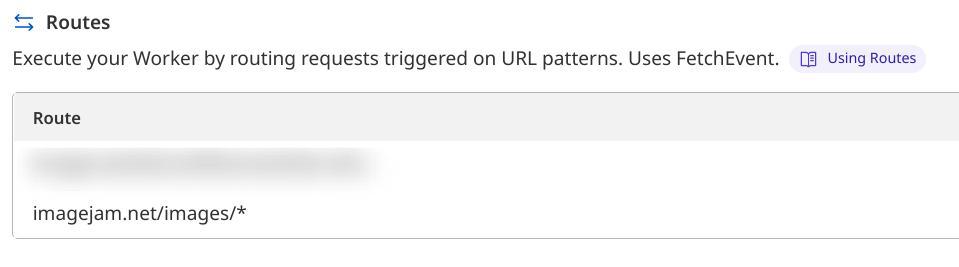
Note, however, that for the Worker to intercept traffic on your existing images URLs, it must be mapped to a route matching the URLs of your existing images. This is done in Workers & Pages > in Overview, select your Worker > Triggers > Routes. For more information, refer to Routes.
In this case, the Worker was set up to trigger on the route imagejam.net/images/*
Conclusion
In this tutorial, you learned how to integrate Cloudflare Images in an existing website. You have also learned how low-profile Cloudflare Images can be, requiring zero changes on your website HTML or URLs if necessary.
We discovered how Cloudflare Images adapts the format and compression of Images upon delivery depending on the browser capabilities, to ensure the best end-user experience possible.
If you enjoyed this tutorial, refer to the Cloudflare Images Documentation to learn more about the many more features Cloudflare Images has to offer.
Obtain Cloudflare Images API credentials
The bulk upload script featured in this tutorial needs Cloudflare Images API credentials in the form of two environment variables:
CF_IMAGES_ACCOUNT_IDCF_IMAGES_API_KEY.
You can get them both in your Cloudflare dashboard 👇:
CF_IMAGES_ACCOUNT_ID
This refers to your Cloudflare Image account ID. You can get this value in your Cloudflare Images dashboard.
CF_IMAGES_API_KEY
This value refers to a Cloudflare API token, with Read and Update permissions for Cloudflare Images. If you do not have one yet, refer to Make your first API request to learn how to create a Cloudflare API token.