MailChannels Pages Plugin
The MailChannels Pages Plugin intercepts all form submissions made which have the data-static-form-name attribute set. Then, it emails these form submissions using the MailChannels API.
Installation
Usage
functions/_middleware.tsimport mailChannelsPlugin from "@cloudflare/pages-plugin-mailchannels";

export const onRequest: PagesFunction = mailChannelsPlugin({  personalizations: [    {      to: [{ name: "ACME Support", email: "support@example.com" }],    },  ],  from: {    name: "ACME Support",    email: "support@example.com",  },  respondWith: () => {    return new Response(      `Thank you for submitting your enquiry. A member of the team will be in touch shortly.`    );  },
});
public/contact.html<body>  <h1>Contact us</h1>  <form data-static-form-name="contact">    <label>Email address <input type="email" name="email" /></label>    <label>Message <textarea name="message"></textarea></label>    <button type="Submit">  </form>
</body>
The Plugin takes a single argument, an object with a number of properties:
-
personalizationsis required and should be set to either an array, or a function which returns an array. If set to a function, it is passed a single object parameter which contains the incomingrequest(Request),formData(FormData) andname(String). This is useful if you want to populate dynamic values based on the form submission. -
fromis also mandatory and should be set to either an object, or a function which returns an object. Again, if set to a function, it is passed a single object parameter which containsrequest,formDataandname. -
subjectis an optionalStringor function which returns a string. It defaults toNew <NAME> form submission. -
contentis an optional array or function which returns an array. It defaults to atext/htmlandtext/plainbody array, detailing the form submission contents. -
respondWithis a required function which takes therequest,formDataandnameobject parameter and returns aResponseorPromiseof aResponse. Assuming the form submission is successful, this function will be called to generate response for visitors.
The method and action attributes of the HTML form do not need to be set. The Plugin will automatically override them to allow it to intercept the submission.
For more information about MailChannels and the options they support, refer to the documentation.
SPF support for MailChannels
To use both MailChannels and Cloudflare Email Routing:
- In Account Home, select the website you would like to add an SPF record for.
- Select DNS > Records > Add Record.
- In the dropdown menu, select TXT as the type of record.
- Enter the SPF record below into your DNS server as a text (
TXT) entry. This must be on the root (@) of the domain. (You currently cannot send mail from a subdomain.)
DKIM support for Mailchannels API
The MailChannels API also allows you add a DomainKeys Identified Mail (DKIM) credential to your DNS records. DKIM is an email authentication standard that helps you to sign email messages from your domain with a digital signature using public-key cryptography. Refer to Cloudflare DNS DKIM guide to learn more.
To add a DKIM signature to a message, add the following fields to the personalization object for the message:
dkim_domain: The domain you are sending the email from. For example, if you are sending an email from support@example.com, set this to example.com.
dkim_selector: Specifies where to find the associated public key in your DNS records. For example, if you make the DKIM record available at mailchannels._domainkey.example.com, set this to mailchannels.
dkim_private_key: The base-64 encoded private key.
Generate DKIM credentials
You can generate your DKIM credentials using OpenSSL in the following steps:
- Generate your private key and DNS record by running the command below in your terminal:
This creates a public key from the private key (openssl rsa -in priv_key.pem -pubout -outform der), encodes it in base64 (openssl base 64 -A), and finally writes it to the dkim_record.txt file.
-
Copy the contents of the
private_key.txtfile and add that as an environment variable to your Pages project by logging into the Cloudflare dashboard > Workers & Pages > your Pages project > Settings > Environment Variables > Add variables. Set the variable name asDKIM_PRIVATE_KEYand the value as the contents ofprivate_key.txtfile. -
Create a DNS record with the content of the generated
dkim_record.txtfile content.
Next, look in your generated dkim_record.txt file for your DKIM credentials, and add them to your website in the Cloudflare dashboard. Follow the steps below:
- In Account Home, select the website you would like to add a DKIM record.
- In the menu on the left select DNS > Records > Add Record.
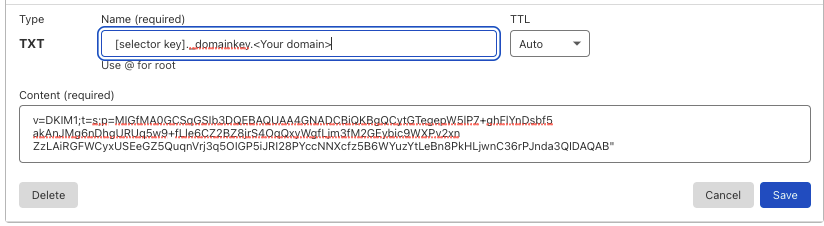
- In the dropdown menu, select TXT as the type of record.
- Enter the DKIM record into your DNS server as a text (
TXT) entry. The name of your DNS record must follow this convention<selector key>._domainkey. For example,mailchannels._domainkey.
- Add the content of your
dkim_record.txtfile in the content field.
Add DKIM fields to personalization object
After generating DKIM records, you must add the corresponding fields to the personalizations object to use DKIM.
The required fields are dkim_domain, dkim_selector, dkim_private_key. The value of these fields must match the values you generated earlier.
The following code block shows an example of using DKIM with the MailChannels Pages Plugin.
functions/_middleware.tsimport mailChannelsPlugin from "@cloudflare/pages-plugin-mailchannels";

export const onRequest: PagesFunction = (context) => mailChannelsPlugin({  personalizations: [    {      to: [{ name: "Some User", email: "user@cloudflare.com" }],      "dkim_domain": "example.com", // The value has to be the domain you added DKIM records to and where you're sending your email from      "dkim_selector": "mailchannels",      "dkim_private_key": context.env.DKIM_PRIVATE_KEY    },  ],  from: {    name: "ACME Support",    email: "support@example.com",  },  respondWith: () => {    return new Response(      `Thank you for submitting your enquiry. A member of the team will be in touch shortly.`    );  },
})(context);