Deploy a managed ruleset in the dashboard for a zone
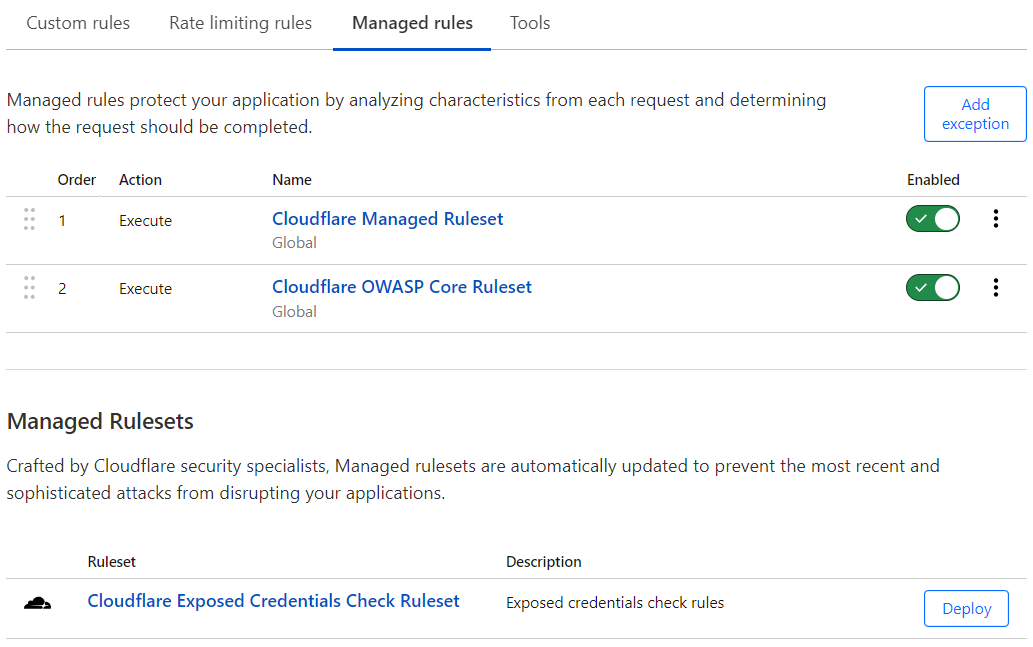
You can deploy and configure managed rulesets for a zone in Security > WAF > Managed rules.
To deploy a managed ruleset for several Enterprise domains in your account, refer to Deploy a managed ruleset in the dashboard for an account.
Deploy a managed ruleset
To deploy a managed ruleset with the default configuration, under Managed Rulesets select Deploy next to a managed ruleset. This operation will deploy the managed ruleset for the current zone.
When you deploy a managed ruleset, the WAF adds an Execute rule, displayed in Managed rules, that deploys the managed ruleset.
Enable or disable a managed ruleset
Select the Enabled toggle next to a managed ruleset to enable or disable it.
Configure a managed ruleset
Configure a managed ruleset to:
- Define specific field values for one or more rules (for example, configure a rule with an action different from the action configured by Cloudflare).
- Disable one or more rules.
- Specify a custom filter expression to apply the rules in the ruleset to a subset of incoming requests.
To skip one or more rules, or entire WAF managed rulesets, add a WAF exception.
Configure field values for all the rules
To configure rule field values for all the rules in a managed ruleset:
-
Log in to the Cloudflare dashboard, and select your account and domain.
-
Go to Security > WAF > Managed rules.
-
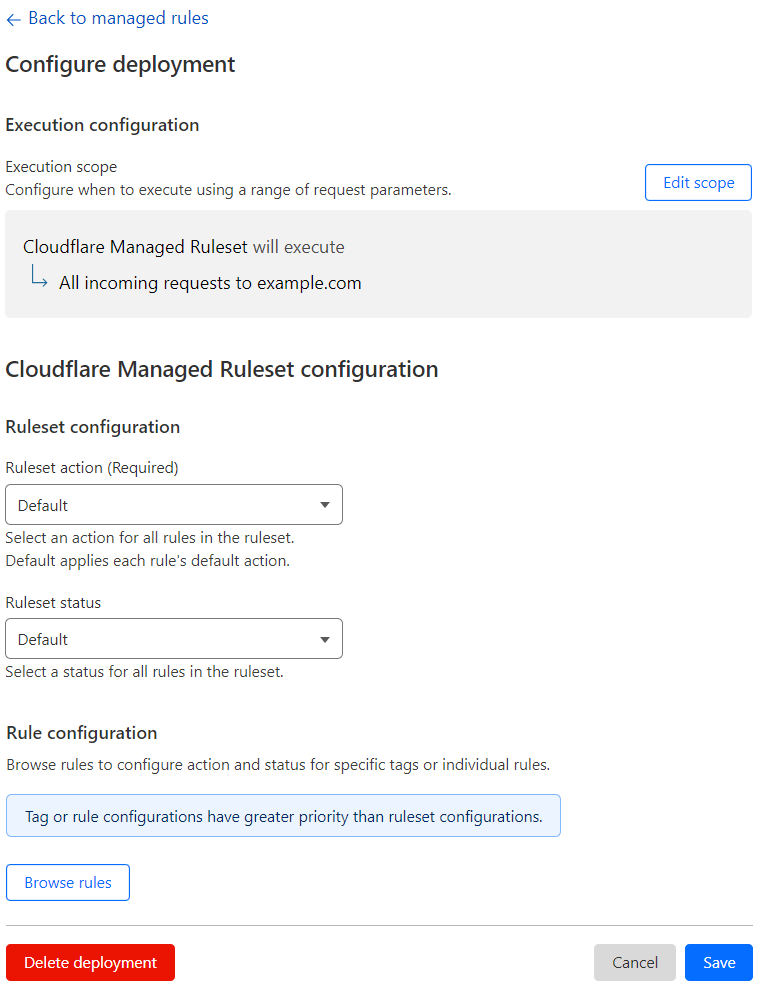
Next to the Execute rule that deploys the managed ruleset you want to configure, select the managed ruleset name.
-
Under Ruleset configuration, set one or more rule fields from the available values in the drop-down lists.
For example, select the action to perform for all the rules in the ruleset from the Ruleset action drop-down list.
-
(Optional) To apply the rules in the ruleset to a subset of incoming requests instead of all requests, set the scope using a custom filter expression.
-
Select Save.
View the rules of a managed ruleset
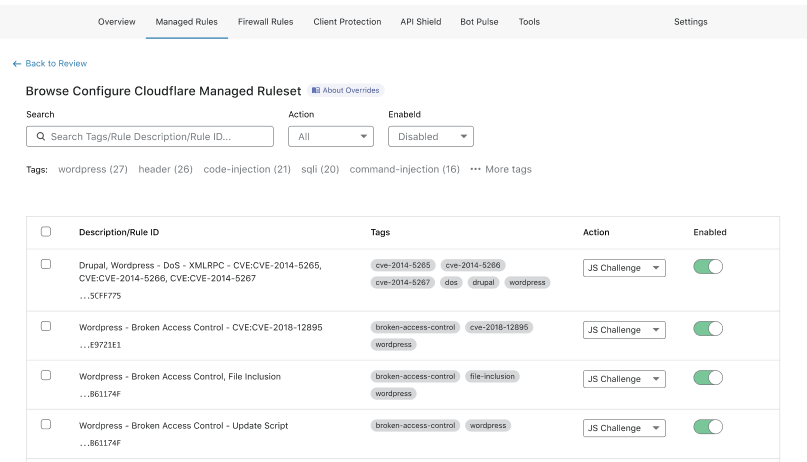
You can browse the available rules in a managed ruleset and search for individual rules or tags.
Use the available filters in the Browse Managed Ruleset interface.
To view the rules of a managed ruleset:
-
Log in to the Cloudflare dashboard, and select your account and domain.
-
Go to Security > WAF > Managed rules.
-
Next to the Execute rule that deploys the managed ruleset you want to browse, select the managed ruleset name.
-
Select Browse rules.
Configure a single rule in a managed ruleset
To configure a rule in the Browse Managed Ruleset interface:
-
Search for a rule using the available filters. You can search for tags.
-
Find the rule you want to configure in the results list.
-
In the result line for the rule you want to change, select the desired value for a field in the displayed drop-down lists. For example, select the rule action in the Action dropdown.
In some managed rulesets, you can also change the status of a rule using the toggle next to the rule.
-
Select Next, and then select Save.
Configure rules in bulk in a managed ruleset
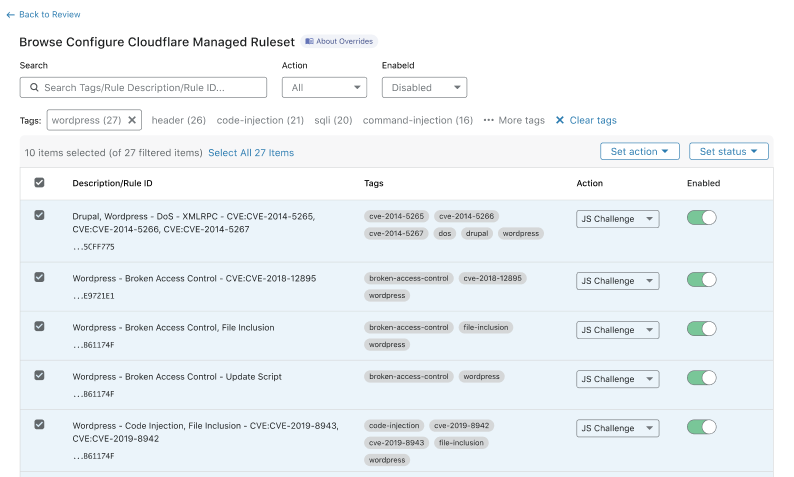
To configure several rules at once in the Browse Managed Ruleset interface:
-
Enter search terms in the available input to find the rules you want to configure. You can search for tags.

-
In the results list, select the checkboxes for all the rules you want to configure.
Alternatively, select a tag name under the search input to filter the rules with that tag, and then select the checkboxes for the rules you want to configure.
-
Update one or more fields for the selected rules using the drop-down lists displayed in the top right corner of the table.
-
Select Next.
-
If you selected a tag, a dialog appears asking you if any new rules with the selected tag should be configured with the field values you selected.
- Select Do not apply to new rules to apply your configurations to the selected rules only.
- Select Apply to new rules if you want to apply your configurations to any new rules with the select tag.
-
Select Save.
Specify a custom expression for the ruleset
To apply the rules in the ruleset to a subset of incoming requests, specify a custom filter expression for the rule that executes the managed ruleset.
-
Log in to the Cloudflare dashboard, and select your account and domain.
-
Go to Security > WAF > Managed rules.
-
Next to the Execute rule that deploys the managed ruleset, select the managed ruleset name.
-
Select Edit scope.
-
Under Set Scope, select Custom filter expression.
-
Under When incoming requests match, define the scope for all the rules in the ruleset using a custom filter expression. Use the Expression Builder or the Expression Editor for defining the expression. For more information, refer to Edit expressions in the dashboard.
-
Select Next, and then select Save.